
OK, you have chosen your recording medium, Digital Audio Tape, a laptop computer, a portable flash-memory recorder such as a Zoom H2 or H4n, or perhaps a DSD format Korg MR-1 or MR-1000. You have picked a suitable mixer or microphone preamps, and have bought yourself a few good microphones. Nice. Unfortunately, all of this fine equipment will do you little good unless you know how to use it. This week, we're going to look at how to use microphones to best advantage in a location recording situation.
The Type of Music Dictates the Procedure
The first thing that has to be considered and understood is the fact that even though we humans tend to look upon microphones as surrogate ears, they really aren't. Our ears don't just pick-up sounds, they, with the help of our brains, both process and interpret sounds. We have the ability to isolate sounds from the background. That's why we can still listen to music in a noisy nightspot. We can pinpoint instruments in space, we can do any number of signal-processing functions without even thinking about it consciously. Still and all, we are applying intelligent signal processing to the sounds that our ears pick up. Microphones cannot do this. All microphones can do is pick-up, and convert to an electric current, whatever sounds occur within the space that the microphones occupy. This sound field is modified only by the characteristics of the microphone itself; it's frequency response, it's pick-up (or polar response) pattern, it's noise-floor characteristics and it's maximum sound-pressure level. That's it. Microphones make no "decisions" about what to highlight, what to suppress, or even what to include in it's pick-up. All of these decisions have to be made by you, the recording engineer, and they have to be made before the music starts. These decisions are a result of knowledge and experience. Here, I can start you down the correct path with some of the more universally applicable knowledge, and the experience, you'll soon pick-up for yourself by experimenting with the principles found here.
The second thing to consider is that because of the above facts about microphones, different kinds of music require slightly different procedures to obtain the best results. Since the recordings that you are likely to make will be recorded in concert before live audiences, studio techniques usually do not apply. While classical music can benefit from a number different microphone arrangements and can give satisfying results from may different perspectives from relatively close-up, to fairly far back in the hall, jazz and pop music needs to be recorded close-up. Distant prospectives only tend to obscure the intricate play of instruments in jazz, and tend to make pop musicians seem far away.
What We Want is Stereo
In the 1960's when multitrack tape recorders became widely available, a technique for recording that utilized 8, 16, 32, 48, 64, or even 96 tracks(!) gained popularity with many of the major record companies. This practice came from the world of rock-and-roll recording with their over-dubbs, sound-on-sound, sound-with-sound and other special effects. It was found that recording each individual instrument and voice to a separate, isolated track allowed for the flexibility to double-up on voices and instruments and add effects in post-production. This was a good move for pop music and can be heard to best advantage in the early works of guitar and recording technology legend Les Paul (with his then wife, Mary Ford). Listen to Ford perform a duet with herself on "How High the Moon" Rock innovators , The Beach Boys, used these techniques to great effect in their famous "Good Vibrations". But, as great as these multichannel techniques were for gimmicky pop and rock music, they were translated to classical and jazz recording for an entirely different reason and with very mixed, and often disastrous results.
It was in the economic atmosphere of the late 1960's and the inflationary '70's where the idea of applying, to classical and jazz, studio multitrack techniques designed for pop music. Recording engineers like Bob Fine (Mercury) and Lewis Leyton (RCA Victor) used minimalist microphone techniques to capture classical performances so stupendously good that they are still revered by audiophiles to this day. In the jazz world, Rudy Van Gelder started recording the L.A. jazz scene with just a "portable" (that meant, in those days, that it had a luggage handle on it) tape recorder and single condenser mike. When he adopted stereo, he still used only two or three microphones. His recordings, too are highly regarded, even today. But in order to record this way, it takes lot a work to set up the microphones to get the perspective just right. All the while, the players are there waiting for the engineers to make minute adjustments to their microphone placement. Somebody decided that this was expensive. Apparently, it was much cheaper to set up empty chairs for the "eventual" musicians and place a microphone in front of each one. One microphone is erected for each instrument (and in some cases, for each group of instruments) and then when that is completed, you called the musicians in, got the performance down on tape in as many tracks as possible and then sent the expensive musicians home. At that point the producer and the mix engineers can play with the balances between the instruments 'till their hearts' content. The result, when mixed down to two tracks, is, unfortunately, not stereo. It's exactly what it seems - multi-track mono. Jazz is almost worse. Each instrument is close miked, committed to its own separate track, and then mixed down to what is called "three-channel" mono. All the instruments are grouped into three groups and sent to either the extreme left, the center (by mixing the instruments equally into both channels), or the extreme right. Again, there is no real stereo image.
But people hear stereophonically, or as the Greek word stereos denotes, three dimensionally. We not only hear musicians arrayed right to left, we also hear them front to back, and vertically. If the brasses at the back of the band are on risers, and thus higher than the players in front, the human ear can hear that, and in a real stereo recording, that information can be captured. One of the great disappointments of commercial recordings, is that so often, it's not captured. It's so easy to do that one wonders what commercial record companies are thinking. This is where you and I can better them. We, as amateurs, can make recordings so lifelike as to be literally spellbinding. We want stereo, and this is how we're going to get it...
Real Stereo Recording
To record in real stereo, you theoretically need only two microphones. I say theoretically because this assumes ideal conditions. In less that ideal conditions, you might need more, but a good stereo-pair of microphones is the correct starting point. What is a stereo-pair? Well, basically it is two identical microphones arrayed in one of the classic stereo microphone configurations and placed in front of a group of musicians in such a way as to accurately capture the sound field that surrounds the performance. There are a number of ways to do this, and all can yield excellent results.
Coincident Pair
In the 1930's, both Bell Labs in the US and the BBC in England experimented with stereo sound. Bell Labs' famous experiments concluded that an accurate recreation of the stereo soundfield was possible with just two channels although it was first postulated that this would require many channels. They kept reducing the number of channels employed until only two remained. The soundfield was still stereo and still coherent. Two channels stuck. In England, a man named Alan Blumlein was working for the Columbia Grammophone Co,. Ltd. when he patented his "Blumlein pair" of figure-of-eight ribbon microphones where the mikes were mounted next to one another and and angled away from the center axis at 90 degrees to one another.

Diagram showing Alan Blumlein's co-incident Microphone technique from the early 1930's . His use of ribbon microphones creates a crossed pair of figure-of-eight patterns where the front lobes are in-phase and the rear lobes are out of phase.
This basic stereo microphone technique is still used and is very viable, giving a sense of space and dimensionality that can make for stunning sound stage presentation. Today, this arrangement is most often referred to as a "coincident pair" and is usually done with cardioid pattern (unidirectional) microphones instead of figure-of-eight bidirectional microphones although the latter can still be used. This arrangement will not work with omni or non directional mikes (unless you want a monaural recording).

Two small cardioid condenser microphones arrayed as a coincident pair. or modified Blumlien pair. Notice that the faces of the two mikes are set at a 90 degree angle to one another and the two screens are almost touching. Notice also that the connectors on the mikes appear backwards. IOW, the right channel cable is connected to the mike on the left and vice-versa. This is because, obviously, the left-most mike is facing the right side of the pickup stage and the right-most mike is aimed at the left side of the stage, Playing with the angle from 90 to 120 degrees will widen or narrow the soundstage.
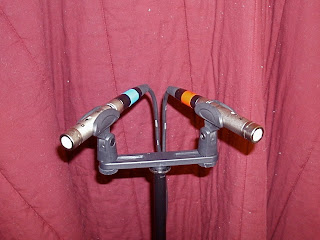
X-Y Pair
The next stereo arrangement to consider is the X-Y pair. This is similar to the Coincident pair except that the mikes are not in the same plane. They are separated by about 7 inches (the distance between the two mounting points on a standard stereo 'T'-bar mount. Again, the point of departure is 90 degrees between the angle of the two microphone elements, but as in the co-incident pair, varying the angle between the mikes either broadens or narrows the stereo stage. Generally speaking, the X-Y arrangement is better for situations where the microphones must be some distance from the ensemble being recorded. Otherwise, if the mikes are right on top of the performers you're going to get the "spotlight" effect where one mike picks up too much of one instrument and not enough of another, ruining the imaging. If you must be close to the ensemble, or if the ensemble is small, the coincident method is better.

Here we see the same two small cardioid microphones arrayed as an X-Y pair. This is an acceptable method for miking orchestras, bands, and solo concert grand pianos. Give the mikes a little space to form a coherent image and to pick-up a bit of hall ambience for best results
Middle-Side or MS Miking
M-S miking is hardest stereo microphone technique for most people to understand. It generally consists of two microphones that are coincident with one another (in this case it is imperative that they be arrayed one above the other, or ideally, as a single-point stereo mike such as the aforementioned Avantone CK-40. M-S requires that one of the two mikes (since they are aligned on the same axis vertically, it doesn't matter which) be set to the cardioid (or the omnidirectional) pattern and the other must be set to a figure-of-eight pattern. The cardioid (or omni) mike is aimed forward at the center of the ensemble as if one was making a monaural recording. The second mike is facing 90 degrees from the center of the cardioid mike's pattern. This means that the two lobes of the figure-of-eight are pointing to each side of the sound stage. Obviously one of the figure-of-eight's lobes is in-phase and the other lobe is out of phase. The cardioid or omni middle or 'M' mike is fed into one channel of the microphone mixer and is pan-potted to center, and the figure-of-eight or 'S' mike is split into two feeds and routed to two separate microphone inputs where S+ is pan-potted to the extreme left and S- is pan-potted to the extreme right. S+ is in phase and the S- is 180 degrees out of phase. The level on the cardioid mike is set normally and the two faders on the figure-of-eight mike are brought-up together. Obviously, if the faders on the figure-of-eight mike are closed, one gets pure mono. but as one brings-up the figure-of-eight side mike, the following matrix occurs:
Where M = the Middle or front-firing cardioid or omni mike and
S+ = the in-phase lobe of the side-firing figure-of-eight microphone
S- = the out-of-phase lobe of the side-firing figure-of-eight microphone and R = right and L= left
L= M + (S+)
R = M + (S-)

M-S or Middle-Side stereo microphone technique. Here, in the example, the front-firing or 'M' mike is an omnidirectional, but it can be a cardioid as well. Cardioid works best in a concert recording situation because it minimizes audience pick-up.
The advantages of M-S miking are several. First of all, an M-S miked recording is perfectly phase coherent and therefore mixes to mono (for mono radio, for instance) perfectly, without loss. More importantly (in this day and age) is that it lets the recording engineer control the width of the soundstage from his recording console. The more Side mike that's mixed-in with the M mike, the wider the pick-up. The less Side, the narrower the soundstage, until, with the Side mike killed completely, one gets straight monaural sound.
Spaced Microphones
The last stereo technique is probably the most obvious: Spaced microphones. This is one of the oldest of the techniques used to make stereo recordings and indeed, the famous Mercury records of the 1950's and 60's as well as the early RCA Red Seal stereo recordings were made this way. Bob Fine of Mercury started recording in the early '50's with a single omnidirectional condenser mike placed in front of the band or orchestra. When stereo came along he added two more omni-directional mikes for a total of three. At first, the center mike was just for mono compatibility (in those days, record companies put out dual inventory. Releases would be available as both stereo and mono titles). Fine would use the center track to cut the mono disk, and the two flanking ones to cut the stereo. At some point, he decided to mix the center mono track equally into both the left and right channels. This gave better center fill on the recordings and if you listen to one of the SACD multichannel releases of some of Fine's three-channel recordings (with a third speaker and amp, preferably identical to the your other two) you would be able to hear how well this works. Most of us can't afford to do that with the price of equipment these days, but I have heard it at an audio dealer and it is impressive. Mostly spaced arrays are done with omni-directional mikes, but it can be done with cardioids. With omni's it is possible to place the mikes farther apart than with cardioids without worrying about a "hole in the middle"effect. Under the best of circumstances, spaced mikes can give a pleasing result, although I've never heard spaced mikes give a pin-point stereo image like the other stereo techniques discussed here. The main reason why they were used in the "golden age of stereo" of the '50's and '60's, and continue to find some favor with record producers, even today, is the fact that omnidirectional microphones tend to have much flatter frequency response and and a lot better low end than do cardioids or figure-of-eight microphones.


A spaced array pair of Microphones
Spaced pairs work because instruments located halfway between the two mikes are picked up equally by both and therefore, during playback, locate themselves between the two speakers. The left microphone picks up the sounds from the left side of the ensemble and the right side of the ensemble with equal intensity, but the sound originating on the left, that is to say, closer to the left microphone, is received earlier than the sound originating on the right side of the ensemble (and vice-versa). This is what gives spaced pairs their stereo ability. In coincident and X-Y setups the differences are both in intensity and phase, and this is what gives the stereo effect. In terms of absolute location the human ear responds to phase and intensity differences more than it does to time delay. This makes the coincident methods better at presenting an accurate soundstage.
Placing Microphones
Placing microphones is somewhat of an art. I know recording engineers who have been doing this for years and they still don't "get it". We're going to assume for sake of this discussion, that the ensemble being recorded is a college band. We are also going to use an X-Y pair of cardioid microphones.
The first thing we need to do is to see where the band will set-up. Hopefully the chairs will be already arranged or you'll have to wait for the members to arrange them. Then, obviously, you have to find the center of the ensemble (usually where the conductor stands, but not always). This is where the stereo pair goes. At first it will help to have the mikes mounted on the T-Bar and to hold them in your hand pointed at the band. Set each mike 45 degrees off of straight-ahead, giving you 90 degrees between each mike "head". Now, sort of "sight" each microphone by looking over the top of the mike head to see where it's pointing. Each mike should bisect the half of the ensemble that it's looking at. In other words, the left mike should be pointing halfway between the outside, stage left edge of the band, and the center or the band, and the right mike should be pointing halfway between the outside, stage right edge of the band and it's center. If it doesn't, step either forward into the stage of back away from it until that line-of-sight is achieved. If, for some physical reason (like the front edge of the stage), you can't get that far back, you can move the mikes further than 90 degrees apart to achieve that sightline, but realize that if the angle is too acute (say, more than 120 degrees), you might get a dead zone in the middle where there is insufficient coverage. On playback, this will give you the dread "hole-in-the-middle" and will destroy the stereo image. Avoid the temptation to adjust the pair to less than a 90 degree angle. This tends to lessen the the stereo effect. If you find that you can only get the proper sight-line by going less than 90 degrees, change your microphone pickup technique from X-Y to coincident. That should give you the stereo pattern you want at a closer range.
Ideally. the microphones need to be behind the conductor, and should peak over his head. Microphones do rather well looking down on the ensemble being recorded. The best positioning ploy is to hang them from the proscenium. This can often be done if the band is playing in an auditorium with a formal stage and stage overhead. Often you can affix the microphones with nylon fishing line and sometimes you can get the auditorium's stage crew to help you. The downside of this arrangement is that it takes a lot of microphone cable to go from the mikes up to the stage fly-area and then over to the side of the stage and down to your equipment. Best results are achieved with the mikes about 5-7 feet above the conductor's head and slightly behind him.
Most of the time, though, you won't have the luxury of being able to "fly" the microphones and you will need stands. This can be awkward especially if the band is situated so far downstage that the conductor's position is near the front edge of the stage. Then you'll have to place your stand on the floor in front of the stage, and in so doing, lose about three feet of your stand's height. This is why it is necessary for you to have access to a really tall studio stand with a counterweighted boom for your mikes.
OK, let's assume that you have placed your stereo pair of mikes as indicated above. Are you finished? Not at all. Some instruments are going to need highlighting.
Highlight Microphones
Sooner or later you are going to come up on a situation where there are vocal soloists, or where some instrument is not being picked-up well enough to register properly in the recording. Another situation where a single stereo pair isn't good enough is when recording, say, a small jazz ensemble such as a trio or quartet in a club venue. All of these situations are going to require highlight microphones.
As daunting as this might, at first seem, It doesn't have to be if you keep a couple of hard-and-fast rules in mind. First of all, think about what you are trying to do. You are trying to augment the pick-up of a single instrument or voice against the overall stereo backdrop provided by the main stereo pair. You are not (in most cases) trying to make that instrument or voice dominate. Remember, while our ears can select and home-in on a single sound against a background of other, perhaps louder sounds, the microphone cannot. If, through your monitoring headphones, you cannot hear a particular instrument or voice, or, if that instrument of voice seems swamped by the rest of the musicians, then this instrument or voice is a prime candidate for highlighting.
Secondly, you want this highlight mike to pick-up as little of the instruments surrounding the highlighted instrument or voice as is possible. This is controlled in three main ways. First of all the highlight microphone needs to be a cardioid mike. Omnis and figure-of-eight mikes cannot be used because, obviously, they pick-up sounds from more than one direction. Next, you can control the pickup by proximity. Place the cardioid mike as close to the instrument (or voice) in question as possible. Because cardioid mikes tend to accentuate low frequencies when they are placed close to the sound source, you might want to invoke the low-cut filter on the microphone - this is especially important if we're talking about a male vocalist or a piano. Lastly, you control the pick-up of adjacent instruments by bringing up the highlight microphone's gain just enough to fit-in with the rest of the ensemble, and no more. We want to hear it, but we don't want it dominate or call attention to itself (unless it's a soloist, of course). You will need to pan-pot the highlight microphone visually to the same place on the left-to-right sound field as the instrument actually occupies in real space. If you don't, the pickup from the stereo pair and the pick-up from the highlighted mike will clash, confusing the image. Never, stereo mike highlights. if you do that it will bring the instrument or voice forward to stage center and again, will confuse the stereo image and even cause phase problems which can be very unpleasant to listen to. These "rules" are, as you can see, just common sense, and with experience, the correct methodology will make itself clear to you.

In this recording, you can see the overall stereo mike in the right edge of the picture. Less noticeable, probably. is the small "lipstick" cardioid mike just inconspicuously peeking over the edge of the piano next to the piano's lid strut. It was apparent in the headphones during this rehearsal in the actual auditorium where the performance was to take place, that the piano was not projecting well enough, even though the open lid is pointing directly at the stereo mike.
Recording A Small Local Ensemble
The easiest thing for amateur recordists to get permission to record is a small ensemble of jazz or pop musicians playing in local bars, coffees houses, restaurants and other public night-spots. Usually, it's not necessary to get permission from the venue management (why would they object to a couple of more pieces of paraphernalia in the musical group's "space"?), but it is vital that you get permission from the musicians themselves. Once the musicians have okayed you recording them (about which more, later), it's not a bad idea to introduce yourself to the venue management as the group's "recordist".
Sometimes a little "background noise" consisting of people talking, glassware rattling, and in general, those sounds that accompany a restaurant, bar, or coffee house will add a bit realism and intimate ambience to a recording of this type, but, you don't want too much. This means that you will want to mike each instrument as closely as possible and separately in addition to your overall stereo pair (as opposed to instead of it). Many will tell you to eliminate the stereo pair altogether and just mix the individual instrument's mikes together. This is a personal choice, of course, and this will work. But you will end up with a "three channel" mono recording instead of stereo.
For this example, we will assume an overall stereo pair and individual mikes on a trio consisting of a piano, a saxophone and a string bass.

Showing arrangement for a small ensemble recorded in a restaurant, bar or coffee house. Ensemble consists of piano, saxophone and stand-up bass. Notice that the stereo pair occupy mike mixer inputs 1 and 2, while the three mono highlight mikes occupy inputs 3, 4, and 5. Highlight mikes are cardioid and are moved close to each instrument to avoid pickup of audience noise.
As can be seen in the illustration, above, a stereo-pair is still used to give overall ambience and stereo imaging. The highlight mikes are cardioid and placed as close as physically possible to the instruments. The saxophone mike can be troublesome because most saxophonists move around a lot when they start to "swing". If you can get the sax player to stand still, facing the microphone, good for you. Otherwise you might have to back that mike off a bit, physically and use more gain. Still, you are going to get a much closer pickup than the stereo pair will produce.
Correctly pan-potting the three close-up or highlight mikes is crucial to maintaining the proper perspective. Of course, the stereo pair is panned far left and far right. The piano, which, in the example above, is on the left, is likewise panned far left. The sax, in the center of the group, is panned to the center, that is to say, equally in both the left and the right channel. and finally, the string bass is panned to the far right.
As far as levels are concerned, you don't want the highlight mikes "louder" than the overall stereo pair. My advice is to start at about 25% the level of the stereo mikes. You will likely have to trim each from that setting to get a proper spread and perspective. Ask the musicians to give you some levels, either individually or together before you start to record. If they plan to play more than one set, you might choose to throw-away the first set for experimental purposes. Be sure to explain that to the musicians. If they are accommodating enough to give you levels before you record, then you are good to go. If you plan to record this group more than once, make note of the final levels and especially where the microphones are placed relative to the players so that you can repeat the setup.
If you want to eliminate the stereo pair, as an experiment, you might actually like the result. Ever since the dawn of the stereo era, it has been traditional to record jazz in what is called three-channel mono where everything is panned into three distinct groups: left, center, and right. Of course, the center channel is a "phantom" channel because we are recording to only two actual channels, but it works fine. What you'll get is a really close-up presentation with little of the venue's hall sound or any of the noise resulting from an audience who will be eating, drinking and talking. Just don't try this with a classical chamber group. It will sound awful (you wouldn't be recording a chamber group in a bar or restaurant anyway).
Getting Permission to Record
Finally, a word about getting permission to record. The most important thing to keep in mind when approaching musicians is that you can give them something they want: A CD of the group performing. Promise them that right off the bat. tell them that you will give them each a CD of that evening's performance and that your services are gratis. It's usually enough to get you in. You should also promise that the recording you are making is for your own use and will not be used for any commercial purposes. I have actually made up a general contract that I take with me. If they seem reluctant, pulling out a contract that binds you to deliver the CDs and to not use the recordings for any purpose other than your own enjoyment, might turn a "no" to a "yes". Do a good job, deliver the CDs to them in a timely fashion, and you might find yourself getting calls from other groups. Musicians usually don't play exclusively with one group. One musician might play with this band one night and that band another. If you're good enough, word will get around.
Next time we'll look at how to use the mixer.

No comments:
Post a Comment